
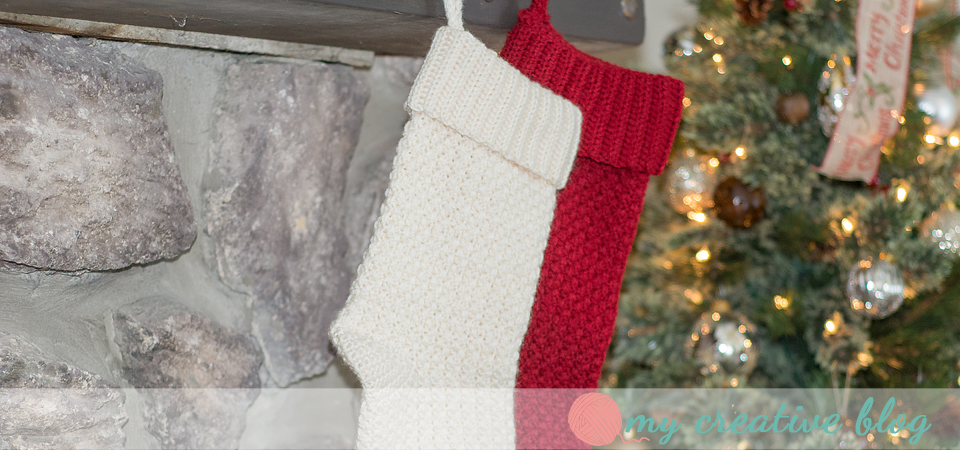
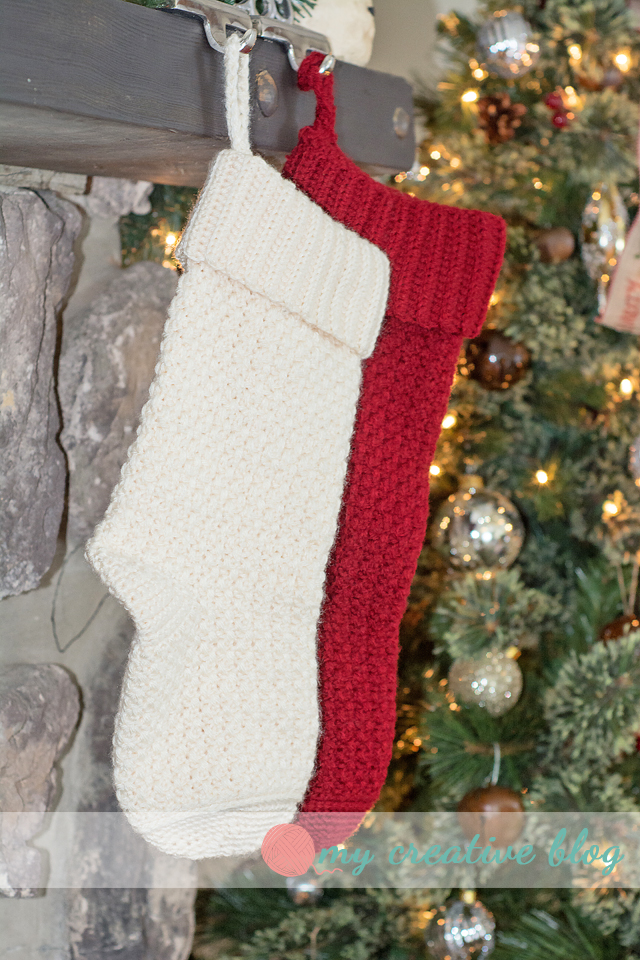
I wanted to add a personal touch to my Christmas pictures. I set up a formal Christmas tree, wrapped some fake presents, and decorated the mantel. I decided the extra special touch would be stockings that I crocheted myself. I did two in a cable stitch pattern that I bought in a Christmas Crochet Pattern book. One in an off white and one in a red. I needed four, but I didn’t want them all to be the same. I love the Moss stitch or Linen stitch texture, so I thought it’d be great to create a couple with this texture. Thus came the pattern below. Enjoy!
Materials:
– 2 skeins of worsted weight yarn. (I used Lionbrand Vanna’s Choice)
– Size E (3.5mm) Crochet Hook
– Size H (5.0mm) Crochet Hook
Size:
17″ long x 5 ½” wide
Abbreviations:
ch = Chain
sp(s) = space(s)
st(s) = stitch(es)
sl st = Slip Stitch
sk = Skip
sc = Single Crochet
sc2tog = Single Crochet 2 Together
hdc = Half Double Crochet
dc = Double Crochet
blo = Back Loop Only
RS = Right Side
WS = Wrong Side
FO = Finish Off
Special Stitches:
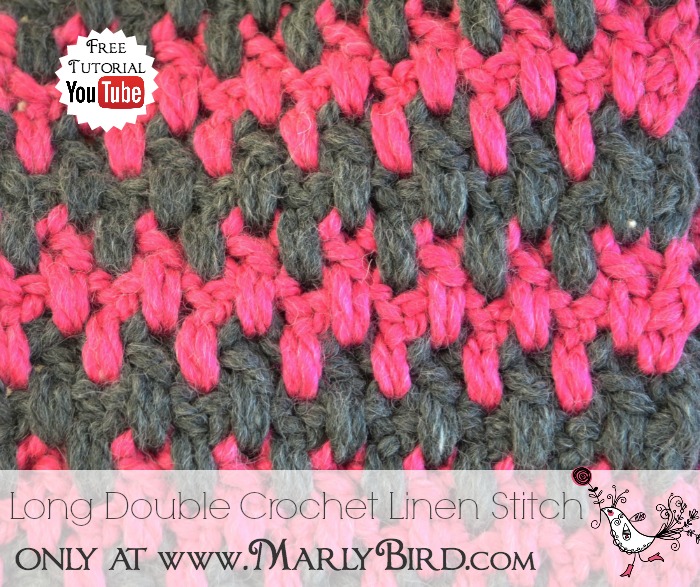
LDC– Long Double Crochet Linen Stitch: Work a double crochet (dc) in the st indicated one row below the previous row worked. This stitch will be worked around the previous row worked. (Also see Extended Moss Stitch)
Stocking:
Cuff:
With 3.5mm hook, ch 16
Row 1: hdc in 2nd ch from hook and each st across, ch 1, turn. (15)
Row 2-46: hdc in BLO of each st across, ch 1, turn. (15)
Fold in half and sl st short ends of cuff together to form a tube. Do not fasten off, continue in round to leg.
Leg:
Round 1: Working along the edge of the tube, sc in the end of each row around. Join, ch 1, turn. (46)
Round 2: Change to 5.0mm hook. hdc in each sc around. Join, ch 2, turn. (46)
Round 3: hdc in each st around. Join, ch 3, turn. (46)
Round 4: (ch 3 of prev round counts as dc, ch 1), sk st *dc in next st, ch 1, sk next st* repeat around. Join, ch 1, turn. (46)
Round 5-38: Ldc in sk st below the next ch sp, ch 1, sk next st, *Ldc in sk st below the next ch sp, ch 1, sk next st* repeat around. Join, ch 1, turn. (46)
Heel:
Row 1: *Ldc in sk st below the next ch sp, sc in next st* repeat 10 times, ch 1, turn. (20)
Row 2: sc 12, ch 1, turn. (12)
Row 3: sc 4, ch 1, turn. (4)
Row 4: sc 4, sc in next st on Row 1, ch 1, turn. (5)
Row 5: sc 5, sc in next st on Row 2, ch 1, turn. (6)
Row 6: sc 6, sc in next st on Row 1, ch 1, turn. (7)
Row 7: sc 7, sc in next st on Row 2, ch 1, turn. (8)
Row 8: sc 8, sc in next st on Row 1, ch 1, turn. (9)
Row 9: sc 9, sc in next st on Row 2, ch 1, turn. (10)
Row 10: sc 10, sc in next st on Row 1, ch 1, turn. (11)
Row 11: sc 11, sc in next st on Row 2, ch 1, turn. (12)
Row 12: sc 12, sc in next st on Row 1, ch 1, turn. (13)
Row 13: sc 13, sc in next st on Row 2, ch 1, turn. (14)
Row 14: sc 14, sc in next st on Row 1, ch 1, turn. (15)
Row 15: sc 15, sc in next st on Row 2, ch 1, turn. (16)
Row 16: sc 16, sc in next st on Row 1, ch 1, turn. (17)
Row 17: sc 17, sc in next st on Row 2, ch 1, turn. (18)
Row 18: sc 18, sc in next st on Row 1, ch 1, turn. (19)
Row 19: sc 19, sc in next st on Row 2. Ldc in sk st below the next ch sp on Row 38, ch 1, sk next st. *Ldc in sk st below the next ch sp, ch 1, sk next st* repeat 12 times, ch 1, turn. (46)
Foot:
Round 1: *Ldc in sk st below the next ch sp, ch 1, sk next st* repeat 13 times, *dc in next st on heel, ch 1, sk next st* repeat 10 times. Join, ch 1, turn. (46)
Round 2-18: *Ldc in sk st below the next ch sp, ch 1, sk next st* repeat around. Join, ch 1, turn. (46)
Round 19: *Ldc in sk st below the next ch sp, sc in next st* repeat around. Join, ch 1, turn. (46)
Toe:
Round 1: sc around, join, ch 1, turn. (46)
Round 2: sl st in each st around, join, ch 1, do not turn. (46)
Round 3: ch 1, sc in each BLO around, join, ch 1, turn. (46)
Round 4-5: ch 1, sc in both loops around, join, ch 1, do not turn. (46)
Round 6: sc 6, *sc2tog, sc 6* repeat around. Join, ch 1. (41)
Round 7: sc 1, sc 5, *sc2tog, sc 5* repeat around. Join, ch 1. (36)
Round 8: *sc 4, sc2tog* repeat around. Join, ch 1. (30)
Round 9: *sc, sc2tog* repeat around. Join, ch 1. (20)
Round 10: *sc2tog* repeat around. Join, ch 1. (10)
Round 11: *sc2tog* repeat around. Join. FO. Leave a long tail to sew toe closed. (5)
Hanging Loop:
ch 25, hdc in 2nd ch from hook and each ch across. FO. Leave long tail to sew to stocking. Sew to Row 1 of leg at center back.
Don’t forget to share your projects on Ravelry or in the comments!
Or share on Instagram and tag #mycreativeblog.

Leave a comment